Showing posts with label Windows. Show all posts
Showing posts with label Windows. Show all posts
Tuesday, August 4, 2015
Download e instalação do Windows 8.1 Pro
Chegou o Windows 8.1
Chegou ontem, dia 18 de outubro, o Windows 8.1 a Portugal. Tal como a Microsoft tinha prometido, este seria uma atualização gratuita para os usuários do Windows 8. Como tal, todos os usuários do Windows 8 poderão fazer a atulização para o 8.1 gratuitamente a partir da Windows Store. Saiba mais aqui
Para os utilizadores do Windows XP, Vista e 7 terão de transferir o ISO de instalação do Windows 8.1 e instalar através desse ISO que poderá passar para uma pendrive ou gravar num DVD para fazer a instalação
Transferir o Windows 8.1
A Microsoft afirmou que não iria disponibilizar ISO do Windows 8.1 (apenas versão Enterprise), mas uma vez instalado, através de métodos específicos, é possível formar um ISO do Windows. Para transferir o Windows 8.1 irá necessitar do BitTorrent ou outros da mesma classe que permitam o download de torrents.
Windows 8.1 Pro (X64) - Português (Portugal)
Windows 8.1 Pro / Core (x86 + x64) - Português (Brasil)*
Windows 8.1 Pro / Core (x86 + x64) - Português (Brasil)*
*Este ISO contém a versão Windows 8.1 Pro x86 , Windows 8.1 Pro x64, Windows 8.1 Core x86 e Windows 8.1 Core x64. Estou a tentar arranjar individuais para ser mais fácil. O ISO pesa cerca de 4GB
Uma vez terminada a transferência, passe para uma pendrive (com mais de 4GB) ou use um DVD e grave o ISO nele.
Instalar o Windows 8.1
Uma vez que a sua pendrive está pronta, insira numa porta USB e reinicie o PC.
Nota: Independentemente do tipo de instalação (Atualização ou Avançada) convém sempre fazer uma backup dos ficheiros pessoais.
Reinicie o PC irá surgir uma imagem como a seguinte.
Nota: Se o PC não arrancar pela pendrive poderá ter de ir às configurações da BIOS


Clique em Seguinte e depois Instalar Agora
Insira uma chave do Windows se for pedida. Use esta XHQ8N-C3MCJ-RQXB6-WCHYG-C9WKB
Esta chave é apenas para instalação e não para ativação

Aceite os termos de licenciamento e Seguinte

Escolha uma das opções
- Actualização. Esta opção substitui a versão actual do Windows pelo Windows 8 e mantém os seus ficheiros, definições e programas no computador.
- Personalizar. Esta opção substitui a versão actual do Windows pelo Windows 8 mas não preserva os seus ficheiros, definições e programas. Por essa razão, por vezes é indicada como instalação limpa.
Agora aguarde enquanto a instalação ocorre. Pode demorar de 20min a várias horas dependendo de PC para PC.


Agora é hora de personalizar o Windows
Escolha um tema e dê nome ao PC. Seguinte

Agora configure o Windows. Pode usar as configurações rápidas.

Inicie sessão na sua conta Microsoft (live, outlook, hotmail ...)

Informações sobre a conexão Windows 8.1 - SkyDrive

Aguarde ...

Pronto para usar ...


Installing Windows 10 Technical Preview [VHD]

 With the release of Windows 10 Technical Preview, I think is a good shot to explain how to install an OS in a VHD (Virtual Hard Disk). Because this is a Preview, which means it's a beta version, installing this edition as Default and unique OS isn't a good choice at all. Crashes, may happen.
One option is install the Windows 10 TP in a virtual machine. In PC's with lack of memory and fast CPU .. you won't be able to enjoy the real Windows 10.
My suggestion, is to create a new partition and install it there, or even more easier and also secure, install it in a Virtual Hard Disk.
Download Windows 10 TP
Redirect to another post
What is a Virtual Hard Disk?
Virtual hard disk (VHD) is a disk image file format for storing the complete contents of a hard drive. The disk image, sometimes called a virtual machine, replicates an existing hard drive and includes all data and structural elements. It can be stored anywhere the physical host can access.
There are two main types of virtual hard disks: fixed-size and dynamically expanding. Both types have a maximum size value that specifies how large the disk will appear to virtual machines. However, fixed-size VHDs will automatically take up the specified amount of physical disk space on the host computer's file system, whereas dynamically expanding disks will allocate space only as needed.
Advantages of installing Windows in VHD
Significant benefits result from the ability to boot a physical computer from a virtual hard drive:
- Ease of deployment: IT organizations can deploy standardized, 'pre-built' configurations on a single VHD. As an example, software engineering organizations which need a specific set of tools for a particular project could simply 'pull' the appropriately-configured VHD from a network location.
- Backup-and-Restore: Changes to the contents of a VHD (such as infection by a virus, or accidental deletion of critical files) are easily undone.
- Multi-User Isolation: Many current operating systems support having multiple users, but offer varying degrees of protection between them (e.g., one user of the OS could become infected by a virus which infects other users, or make changes to the OS which affect other users). By giving each user their own version of the operating system—say, by creating for each of them a differencing VHD based on a base installation of the OS—changes to any particular child image would have no effect on any of the other child images.
Create and mount VHD
I will work just in CMD (Windows Command Prompt)
- Run CMD
On Windows 8.x, press Windows + S and search for cmd
For older OS you can search for it on Start Menu
 for cmd
 In addition, you can access Prompt by pressing Windows + R and type cmd, then OK
To work with VHD files, I'll use the diskpart tool.
DiskPart.exe is a text-mode command interpreter that enables you to manage objects (disks, partitions, or volumes) by using scripts or direct input from a command prompt. Before you can use DiskPart.exe commands on a disk, partition, or volume, you must first list and then select the object to give it focus. When an object has focus, any DiskPart.exe commands that you type act on that object. [source]
- Once on Prompt, type diskpart to initialize diskpart tool. (require administrator rights
)

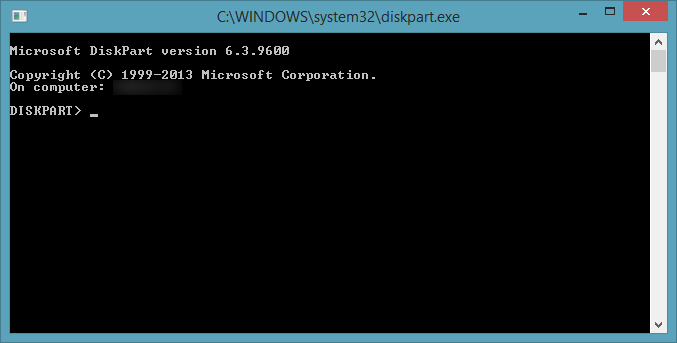 A new window will show up (see more). Now type the following script [change the specifications as you wish like path, size, type ...]
create vdisk file="D:\vdisk.vhd" maximum=40000 type=expandable
attach vdisk
create partition primary
assign letter=m
format
attach vdisk
create partition primary
assign letter=m
format
Remember this is just an example
In the first line, the syntax is based on:
create vdisk file=<file path> [maximum=<size in Megabytes>] |{[type=<fixed|expandable>]
You can also modify the fourth line. There, you tell diskpart which drive letter you want to assign to the volume. In this case, M:
Be careful with the letter you chose. You can get an exception because that letter is already in use. Go to Windows Explorer followed by Computer and take a look for the letters in use. You can't use any of them.

VHD was successfully created and formatted.
WAIK Tools (Windows Automated Installation Kit)
The Windows Automated Installation Kit (Windows AIK) is designed to help original equipment manufacturers (OEMs), system builders, and corporate IT professionals deploy Windows onto new hardware. The Windows AIK is a set of deployment tools supporting the latest release of Windows. This guide describes the methods, tools, and requirements for deploying Windows. [source]
Because we just need imagex, is ridiculous download an ISO file with 2Gb or more when imagex actually is a 598kb size file.
There is an app which allow you to download the main tools for Windows Vista/7/8.x including imagex.
Know more about imagex tool


- Copy the folder path of imagex.exe [example: C:\Folder_name]
- In pictures above, the path is a bit extensive and complex to use in command prompt. To avoid any problems, please, copy the imagex.exe to directory C: .(or C:\Sources for example, something simple). The following scripts in this tutorial will present the path C:\imagex.exe (images may not match, I will update them)
- Mount the download ISO file (Windows 10)
In Windows 7 and 8.x, exists an integrated tool in Windows which allow you to mount virtual images. Just right-click on Iso file and click Mount. If that option is not available, use thirdly-part software like UltraIso, Deamon Tools ...
- Run cmd as administrator
On Windows 8.x, press Windows + S and search for cmd. Right-click and press Run as Admin
Works the same way for older OS. On Start Menu, search for cmd and Run as Admin
, search for cmd and Run as Admin- Type the location imagex.exe
cd _folder path of imagex_
Example: cd C:\
Example2: cd C:\Folder
(ignore the considered path on image)

- Type
imagex /apply _ISO mounted path\sources\install.wim_ 1 _VHD assigned letter_
Example: imagex /apply f:\sources\install.wim 1 m:
The base structure is
imagex /apply image_file image_number image_name image_path
image_file : Specifies the name and the location of the volume image applied to the directory.
image_number : Specifies the number that references the specific volume within the .wim file.
image_path : Specifies the file path where the image will be applied.
Wait a few minutes for completation


Adding a VHD to native boot
- Run cmd as administrator
On Windows 8.x, press Windows + S and search for cmd. Right-click and press Run as Admin
Works the same way for older OS. On Start Menu, search for cmd and Run as Admin
, search for cmd and Run as Admin- Type
bcdboot _vhd assigned letter_\Windows
Example: bcdboot M:\Windows
Concluding
Now, restart your PC. Boot to Windows 10 Technical Preview and finish installation
[pictures and more support coming soon]
Windows 10 Technical Preview Product Key
NKJFK-GPHP7-G8C3J-P6JXR-HQRJR
Como ver as informações do sistema?

Como ver as informações do meu Sistema?
Para ver as informações do sistema, aperte as teclas
 +
+ 
Isto irá abrir o Executar. Digite msconfig e clique em OK.

Irá surgir então a janela com as Informações do Sistema
Erro 0x0000135 Windows XP

Problema
Quando executo uma aplicação, ocorre um erro do tipo 0x0000135. O que fazer?
O Windows tem o Service Pack 3 e .Net Framework 4.0?
O mais provável, é o erro ocorrer pelo seu .Net Framework ser antigo. No entanto, para ter a versão mais recente precisa também do Windows XP Service Pack 3!
 Aperte a tecla Windows + R. Isto irá abrir o Executar.
  Irá surgir numa janela pequena no canto inferior esquerdo. Digita msinfo32 e clica em OK.
Esta ação permite abrir as Informações do Sistema!
Nas primeiras linhas tem o nome do SO (Sistema Operativo) e na segunda linha irá encontrar a versão do seu Service Pack conforme a imagem abaixo.

Se o seu Service Pack é o 3 pode ir para o próximo passo que é instalar o .Net Framework 4.0
Caso contrário, clique aqui para transferir o Service Pack 3. Tenha em atenção toda a documentação oficial da Microsoft. A instalação do SP é demorada. Pode levar cerca de 1 hora!
.Net Framework 4.0 (Windows XP)
Agora estamos prontos para instalar o .Net Framework da Microsoft. Acesse este link para fazer o download do ficheiro de instalação. Siga os passos da documentação. Quando concluído reinicia o PC e tenta abrir o aplicativo em questão!
Atualizar do Windows 8 para Windows 8.1
Chegou o Windows 8.1

 Chegou ontem, dia 18 de outubro, o Windows 8.1 a Portugal. Tal como a Microsoft tinha prometido, este seria uma atualização gratuita para os usuários do Windows 8. Além disso, é muito fácil de atualizar (mas somente para alguns visto que já há muita gente a queixar-se de problemas). Antes de começar, é obrigatório ter o Windows 8 atualizado. Como posso atualizar o meu Windows 8? É muito simples. Arraste o rato para o lado direito canto superior/inferior para aparecer a barra lateral. Clique em Defenições < Alterar defenições do PC
Irá abrir uma app do Windows que permite configurar o mesmo. Clique no último item do Menu do lado esquero "Windows Updates". Procure por novas atualizações e instale. Será necessário reiniciar o PC. Porquê ter de atualizar o PC? A Microsoft já tinha avisado que para fazer este upgrade do Windows 8 para o 8.1 seria preciso ter o 8 completamente atualizado. Mas a principal atualização em causa é a KB 2871389 que prepara o Windows para a atualização. Apenas com esta, vai ser possivel instalar o Windows 8.1 através do Windows Store. Pode baixar a atualização através deste link

 Agora deverá estar pronto para começar! Vá ao Menu Iniciar e clique na app Loja
Logo na Página Inicial da app irá surgir uma imagem como a seguinte:
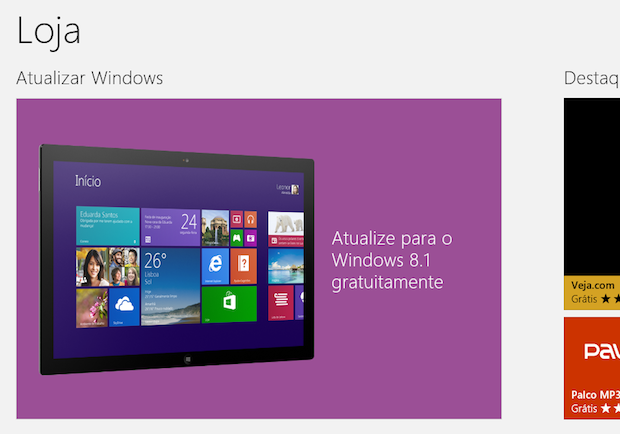 Clique na imagem com o texto "Atualize para o Windows 8.1 gratuitamente"
 Clique em "Transferir"/"Baixar"
Quando o download terminar, o assistente de instalação informa que o computador precisa ser reiniciado. Guarde tudo o que estiver a fazer e clique em “Reiniciar Agora”

A instalação irá começar!
Desativar reinicio automático em caso de erro Windows 7

O Windows quando instalado está pré-definido para reiniciar automaticamente em caso de erro evitando assim, os erros conhecido como "Blue Screen". Mas, quando estes erros são constantes dá jeito saber através do "Blue Screen" qual a causa desse mesmo erro. Para tal, temos de ativar esta função, ou seja desativar o reinicio automático.
Como?
Bastante simples!
 Aperte as teclas Windows + R para abrir o Executar! Depois digite systempropertiesadvanced e clique em OK.
 Irá surgir uma nova janela como a seguinte. Clique em Defenições no grupo Arranque e recuperação.
Irá surgir mais uma janela. Agora, desmarque a caixa Reiniciar automaticamente e clique em OK para guardar as novas definições.

Windows 8.x Wireless problem after sleep or hibernate
Every time I set my Windows 8.x to sleep or hibernate, I face Wireless authentication problems.
I have a old PC but equipped with Windows 8.1 Update 1 and today I noticed a problem. Every time I hibernate or set PC to sleep, and then turn it on, I face Wireless authentication problems. I am not sure if it is a Windows problem, a driver problem or if it is a PC's firmware and Windows 8 compatibility problem.
All I know is that only happens with Windows 8.x, in Windows 7 no problem. I also noticed this problem in another PC I have, a laptop.
The way as I fix it, is:
Doing these steps every time, is annoying. I found out a solution, however there must be secondary problems for Laptops or Notebooks when you apply my solution propose.
Basically, what I do is to disable the option which tells Windows to turn off my Network adapter. By default the Windows turn it off, but for some reason can't wake it it properly.
How to fix it?
Go back to Device Manager. Go to Network Adapters < right-click your Wireless Adapter < Properties < Power Management tab and finally disable the first check-box Allow the computer to turn off this device to save power
The special case: Laptops and Notebooks
"...however there must be secondary problems for Laptops or Notebooks when you apply my solution propose."
Now I would like to explain the my sentence's meaning. I once had a problem in my Laptop because of my network adapter. Because the option turn off the device was disabled, the Sleep and Hibernate options didn't work as they should. I mean, the PC screen was black and the led lights switched off [in case of sleep, the power light blinks] but after a few seconds it wake up alone. What I suggest to you, try my propose and if you face problems like this, just enable the option to turn off the device and maybe avoid Sleep/Hibernate functions.
Any question send e-mail to antivirusdownloadfullversion@outlook.com
All I know is that only happens with Windows 8.x, in Windows 7 no problem. I also noticed this problem in another PC I have, a laptop.
The way as I fix it, is:
- Restarting Windows
- Go to Device Manager (by pressing keys Windows + X, a Menu show up in the bottom, left side), and disable my Wireless Network Adapter. Then I enable it again and finally I can connect and use Internet. In other words, I restart the driver.
Doing these steps every time, is annoying. I found out a solution, however there must be secondary problems for Laptops or Notebooks when you apply my solution propose.
Basically, what I do is to disable the option which tells Windows to turn off my Network adapter. By default the Windows turn it off, but for some reason can't wake it it properly.
How to fix it?
Go back to Device Manager. Go to Network Adapters < right-click your Wireless Adapter < Properties < Power Management tab and finally disable the first check-box Allow the computer to turn off this device to save power
The special case: Laptops and Notebooks
"...however there must be secondary problems for Laptops or Notebooks when you apply my solution propose."
Now I would like to explain the my sentence's meaning. I once had a problem in my Laptop because of my network adapter. Because the option turn off the device was disabled, the Sleep and Hibernate options didn't work as they should. I mean, the PC screen was black and the led lights switched off [in case of sleep, the power light blinks] but after a few seconds it wake up alone. What I suggest to you, try my propose and if you face problems like this, just enable the option to turn off the device and maybe avoid Sleep/Hibernate functions.
Any question send e-mail to antivirusdownloadfullversion@outlook.com
How to convert ESD to ISO file

If you are following what is happening around Windows and you are part of Windows Insiders program, you may be familiar with "esd files". Actually, the ESD files started showing up with Windows 8. I don't know for sure it's origin as there is no much information about it, however I bet it was created by Microsoft because of it's huge need of creating highly compressed files. That feature came with Windows 8 as new updates, like Windows 8.1, were delivered by Windows Store. Well, downloading files larger than 3GB would be a problem, specially for users with limited download speed. To improve this process and create an optimized update mechanism was need to create highly compressed files of media boots, which commonly come in image files like ISO or IMG extensions.
Amazingly, ESD is an encryption process that can reduce a 3GB size file to.. 1,7GB (this happened to me with some Windows 10 ESD files). This saves a lot download time and network data, but it's a con: so you can manage this encrypted files, you will need to convert it back to ISO, a process that may take several minutes - 10 to 15 minutes.
In this post I will explain step by step how to do it by using a simple tool - that for some users will be at least weird because is a cmd program, but keep calm it's very simple to deal with :)
What do you need?
First of all, and logically, you need an ESD file. Place it on a easy access path
Second, you need to download the tool I mentioned above. Download it here
For newer builds, since 10158 the RSA keys were changed, so use this new version. Download here
Ok, what's next?
After you extract the rar file you downloaded, you will find a decrypt.cmd. Right-click on it an Run as administrator

Now, you need to past the full path of the file, without quotes ""
You can deal with this many ways
- You can move the esd file to a easy and short path (C:\Example) and rename it to example.esd. In this case, you can manually type on console C:\Example\example.esd and hit Enter and go to the next step.
- Another way of doing this, which is valid on any Windows OS, is right-clicking on the esd file, go to Properties, and on the Security tab, you can select the full path and copy it (Control + C or right-click and copy).
- Another way of doing this, which is valid on any Windows OS, is right-clicking on the esd file, go to Properties, and on the Security tab, you can select the full path and copy it (Control + C or right-click and copy).


Back to the console, on Windows 10 you can use your keys Control+V. On older Windows versions, you can click the icon on the top, Edit and Paste

Once you pasted the path, or written it manually, press Enter key
You will have a couple of options here. We want to convert a full media boot encrypted in ESD to ISO, you select the option 1

Next, prepare your coffee or tea, take a sit and relax while the tool works.
When you get the message Done on the console, you can close it.

Where is my ISO file?
By default, the program place it under the path where decrypt.cmd file is. In my case, it is located on C:\Users\Tsunami\Downloads\ESD_to_Iso and there it is my ISO file too.

Subscribe to:
Posts (Atom)