Tuesday, August 4, 2015
Creating a bootable pen drive in Command Prompt
Introduction
Nowadays installing an Operative System like Windows is easier than never. In this tutorial I am going to explain how to install Windows operating systems by using a simple USB flash. Note that for this I won't use thirdly part software, in other words, I will only use command prompt interface: cmd and diskpart.
Bootable USB flash! What does it mean?
The definition of bootable USB pen drive is that you can boot through it. This means when you turn on the computer, BIOS will recognize files inside the pen which allow to start something, in this case, the Windows installation/repair environment.
This is the same when you boot Windows OS, if Windows don't contain those files (because were deleted or are corrupted), it won't start which results, for example, in a very well known error: "BOOTMGR is missing"
The BOOTMGR (Windows Boot Manager) or NTLDR (New Technology Loader), for Windows XP and earlier versions, are a small piece of software that's loaded from the volume boot code, part of the volume boot record.

Benefits of installing Windows through USB sticks
- Economize: If you are just like me, always getting the most recent Operating Systems, burning them to DVD's is quite expensive. That's because for each OS you need a single DVD. Using a pen drive is easier because after the installation process you can clean all data in it (format) and use it over and over again for other clean installations of different OS as well, after performing Windows installation, you can keep using your pen disk for personal data.
- Faster: By using pen disks to perform Windows installations, when compared with total elapsed time if you did it through DVD, you will notice that the whole process is faster! The explanation is simple: pen flash's (in general) read speed is higher than DVD's
- New devices: This idea of installing Windows (and other Operating Systems) through pen disks came up specially with the introduction of netbooks in the market. The problem is these "super mobile" computers is that usually don't have a CD/DVD reader! The solution is installing OS from USB. Because this method is more efficient, it was extended to desktops and laptops
Getting ready
As I have mentioned in introduction, I won't make use of thirdly-part software. The idea is doing it using embedded Windows tools. More specifically, the cmd and diskpart
If you prefer software with graphical environment, I would recommend you to try Windows USB/DVD Download Tool or WinToFlash
Before we move on, let's see what do you need...
- an installation DVD (if you have an original one that came with the computer or if you bought it) or an image file (for example, ISO, IMG) of Windows Setup
- pen drive with capacity of 4GB or more (this is the recommend for recent Windows like 7, 8.x ...). This is valid if we are talking about common ISO files. If you downloaded on the internet one of those ISO's known as All-In-One (AIO), which contains worldwide languages packs and all Windows editions (Home Premium/Basic, Professional, Ultimate..) plus both processor architectures x32 and x86, I am sure you will need a larger pen disk capacity. That kind of ISO files have a size of 15-20GB or even more. What I recommend you is to check image file size; that's the minimum pen storage capacity you'll need. Make sure you have no personal data inside the flash. Before start copying files from DVD/ISO you must format the pen (this is highly recommended, also because the pen must be formatted in NTFS). Don't forget to backup your personal files, if you have any contained in USB stick. You can upload them to online file storages (OneDrive, Google Drive, Mega, Mediafire...)
Start
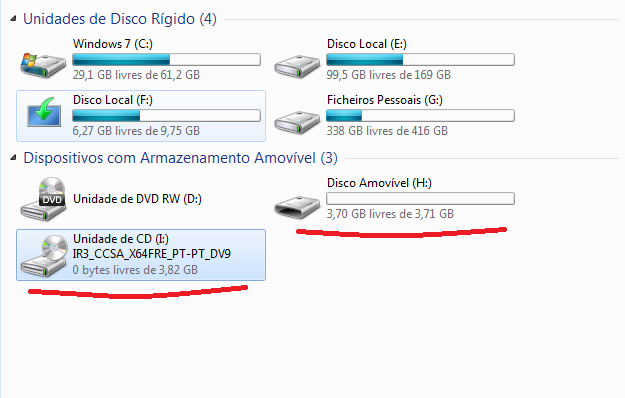
Plug-in your pen. The assigned letter of my pen is H
Access the folder where your ISO file is or insert the Windows installation DVD. Right click and Mount. This option is only available for Windows 8.x and Windows 10, if you have older versions you need thirdly-part software (like UltraIso). Check the assigned letter (go to My Computer). In my case is letter I
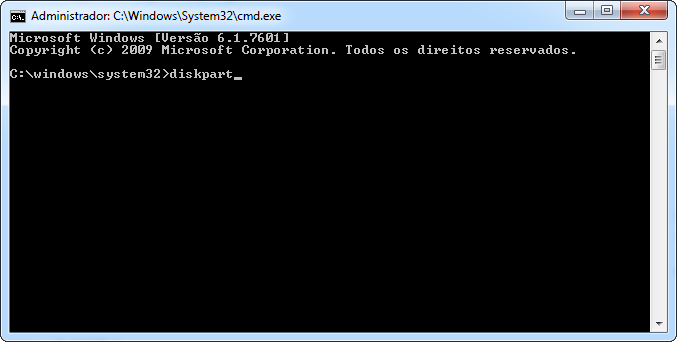 The next step is to open the command promt with administrator rights. Go to start , in the search bar type cmd , and right click the cmd file and select run as administrator
Now we will format the pen drive using the diskpart tool. Type diskpart and hit Enter.
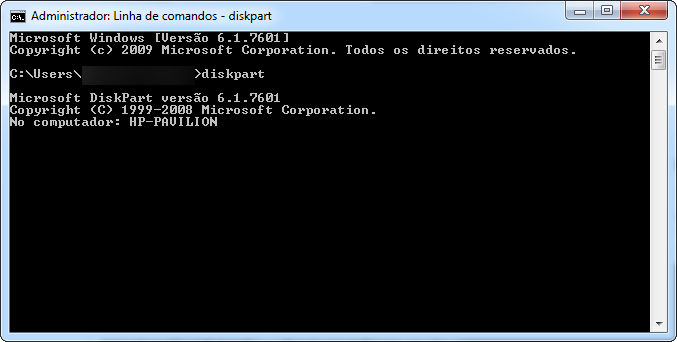
(highlighted in red)
Type the following
list disk ➱ select disk 2
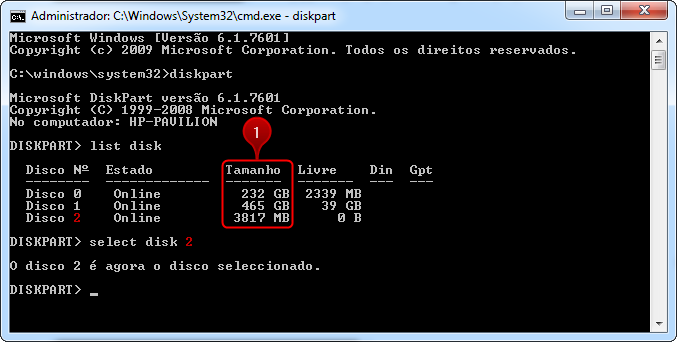
Note: Each plugged disk is identified by diskpart with numbers starting in zero {0,1,2,3..}. To identify which one is your pendrive check the size section as shown in the picture. In my case the pendrive is disk 2
Now type
clean ➱ create partition primary ➱ active ➱ format fs=ntfs
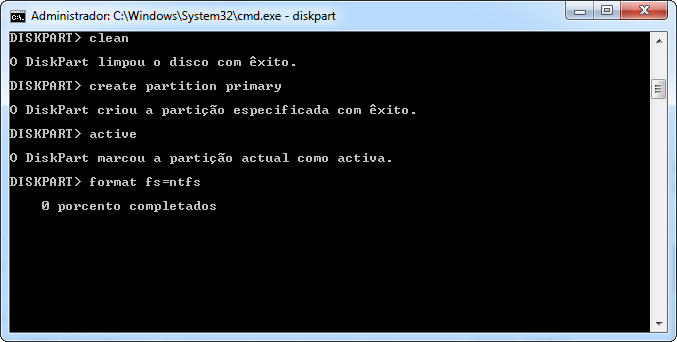
This will take a few minutes...
You can specify the assigned letter by typing ➱ assign letter H
By just typing assign, diskpart will search for available letters and will associate one (by alphabetic order)
We are done in diskpart so type exit
Don't close cmd window yet, now we will start copying files from the image file to the pen disk
Remember that in my case, the Iso is mounted in drive I and my pen has assigned letter H
Type
xcopy i:\*.* /s/e/f h:\
This process takes about 10-15 minutes depending on the write speed of the pen flash
Concluding
Once the xcopy process is completed, you are ready to restart your PC and boot through your pen. For some computers you might have to change the boot order in BIOS and this procedure is different for each motherboard manufacture. You have problems on it do a quick search on google and visit your manufacturers support!!
Once the xcopy process is completed, you are ready to restart your PC and boot through your pen. For some computers you might have to change the boot order in BIOS and this procedure is different for each motherboard manufacture. You have problems on it do a quick search on google and visit your manufacturers support!!
Labels:
Windows
Subscribe to:
Post Comments (Atom)


No comments:
Post a Comment